The post [Parts 1 & 2] The Display Grid: How to Scale Your AdWords Display Campaigns Profitably with Laser-Focused Targeting and the Right Choice of Ad Type appeared first on DigitalMarketer.
]]>Want to reach millions of potential new leads and generate thousands of new customers?
 There are countless ways to generate paid traffic online, including dozens of ad networks, solo ad providers, social media sites, native ad networks, and more.
Each of these options has its own pros and cons. But, if you want to achieve MASSIVE scale in your business, there’s one network that deserves the bulk of your attention:
The Google Display Network (GDN).
There’s one reason why you should focus on the GDN, and it can be summed up in one word: potential.
That’s why, in this post, I’ll be sharing a new system I developed for building effective ad + targeting combinations for your campaigns.
I call it…
The Display Grid.
Think of The Display Grid as your one-page “cheat sheet” to building out effective Google Display campaigns.
Here’s what it looks like:

In Part 1 of this article, I’ll cover the top row, which includes all the different targeting options in The Display Grid.
And in Part 2, I’ll cover the left column, which includes all the different ad types & formats. Then I’ll cover more in-depth and advanced uses of how you can employ The Display Grid to build more effective display campaigns.
We have a lot to cover, so let’s get right into it. First, let’s talk about…
The Infinite Potential of Google Display Network
Google Display has an enormous reach. Through it, you have the potential to reach over 90% of users online. You can place ads on YouTube, on mobile apps, and over two million websites that monetize their visitors with Google ads.
(The number of individual pages you can reach on GDN reaches into the billions.) 
As a result, your ability to scale and reach new users on GDN is nearly unlimited.
Keep in mind that Google display ads are different than Google search ads. When many people think of Google advertising, they think of search traffic.
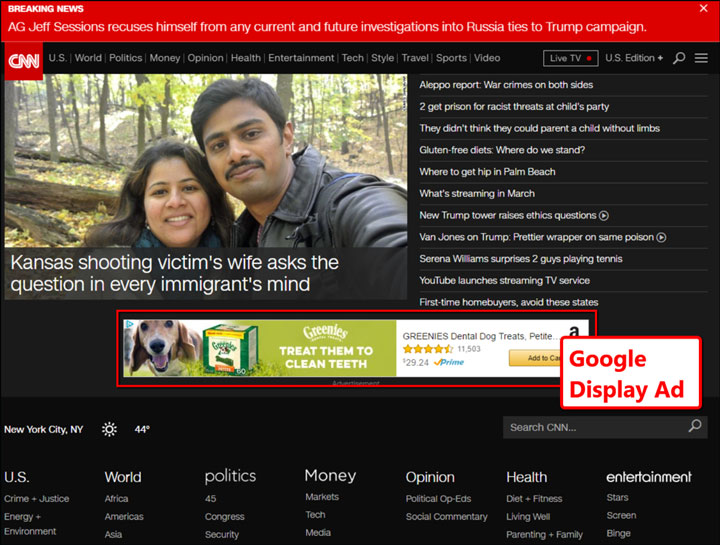
Search traffic is when you advertise to people who have just searched for a keyword that’s relevant to your business. Here’s an example of search ads for the keyword phrase “dental dog treats”:

Advertising on the Search Network is a great strategy because it puts your ads in front of people who are actively searching for something related to your service.
In this case, I searched for “dental dog treats”… so the odds of me purchasing dental dog treats in the near future is very high. (If you smelled my dog’s breath, you’d understand.) As a result, Google Search Ads tend to have a high conversion rate.
The downside to search ads is that your audience is limited.
There are only so many people searching for “dental dog treats” in Google. And once you max out that traffic—when you’re showing up for all of those searches—there’s no easy way to generate more searches.
This is where the Display Network comes in.
The GDN lets you serve your ads to a much larger audience of people who might be really interested in your product or service, but who are not actively searching for it at the moment.
Here’s an example of a display ad for a dental dog treat:
Display ads allow you to really expand your reach.
It’s a great choice for mass-appeal markets like weight loss because it can send you a tremendous volume of traffic.
GDN also works well for topics that have a lot of interest but not a lot of search activity. For example, a person may rarely search for topics related to spirituality… but if you put a good spirituality ad in front of them, they’ll stop what they’re doing and pay attention.
So, if the GDN has such great potential, why isn’t everybody using it to rapidly scale their business and bring in a flood of new visitors and customers?
Well, the truth is that it’s (unfortunately) rare to see a GDN campaign that is well set-up.
Why?
Google’s Display Network offers a dizzying array of options and settings, including multiple targeting options and ad types.
And if you don’t set up your campaigns well, you’ll end up showing the wrong ads to the wrong people… blowing through your ad spend without generating any sort of return on investment (ROI).
Lucky for you, I’ve developed a system that makes it simpler than ever for you to figure out the most effective ad + targeting combinations for your campaigns. I present to you…
The Display Grid: A New Way of Visualizing & Building GDN Campaigns
As I’ve said, think of The Display Grid as your one-page “cheat sheet” to building out effective Google Display campaigns.
It shows you all the different combinations of ad types and targeting options.
When it’s all said and done, you will have 147 different ways to narrow down your GDN campaigns to help you scale your business bigger, faster, and more profitably.
To get your copy of The Display Grid, just visit thedisplaygrid.com and click on “File,” then “Make a copy.”
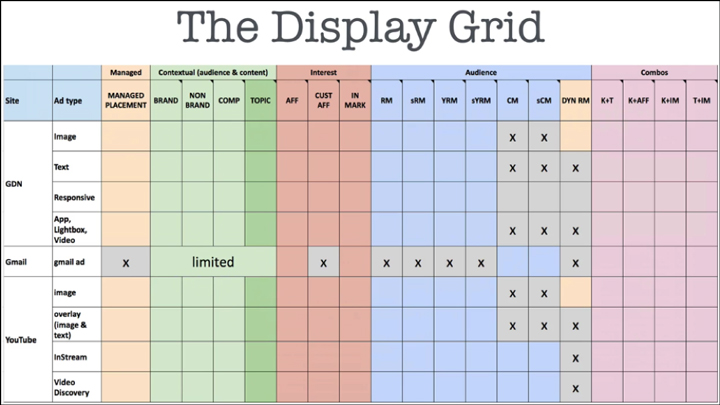
To summarize, The Display Grid gives you a quick visual overview of all 147 different combinations of ad types and targeting options available inside of AdWords.
Most advertisers, not realizing just how many options are available to them, end up using the two most basic options: managed placements with image banner ads.
As a result, they end up filling only ONE of these 147 squares (and missing out on the other 146):
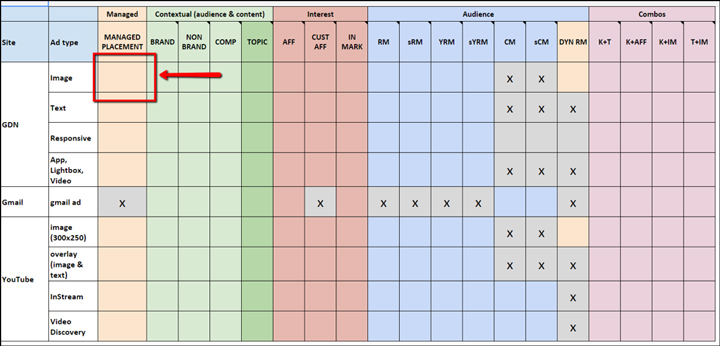
But now, with The Display Grid in your arsenal, you’ll never make that mistake.
Let’s dig into the targeting options in GDN.
You can group the targeting options into four main buckets: Managed Targeting, Contextual Targeting, Behavioral Targeting, and Combined Targeting.
Managed Targeting
Managed targeting means that you personally choose the websites where you want to show your ads.
If you know some of the places where your target market likes to hang out online, you can add those websites to AdWords as a Managed Placement.
How to Add Managed Placements in AdWords
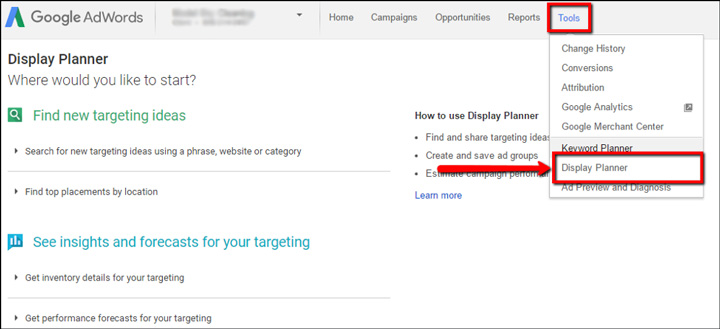
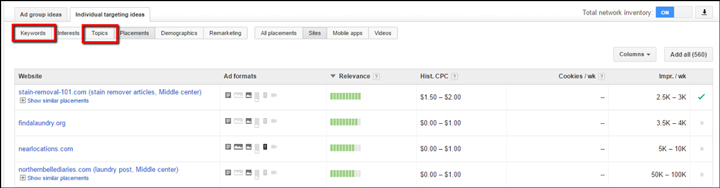
To add managed placements inside of AdWords, we’re going to use a tool called the Display Planner.
You’ll find this tool inside your AdWords account by clicking “Tools” at the top, and then clicking on “Display Planner”:
If you click on “find new targeting ideas,” you can enter keywords and/or a landing page to find new placement ideas:
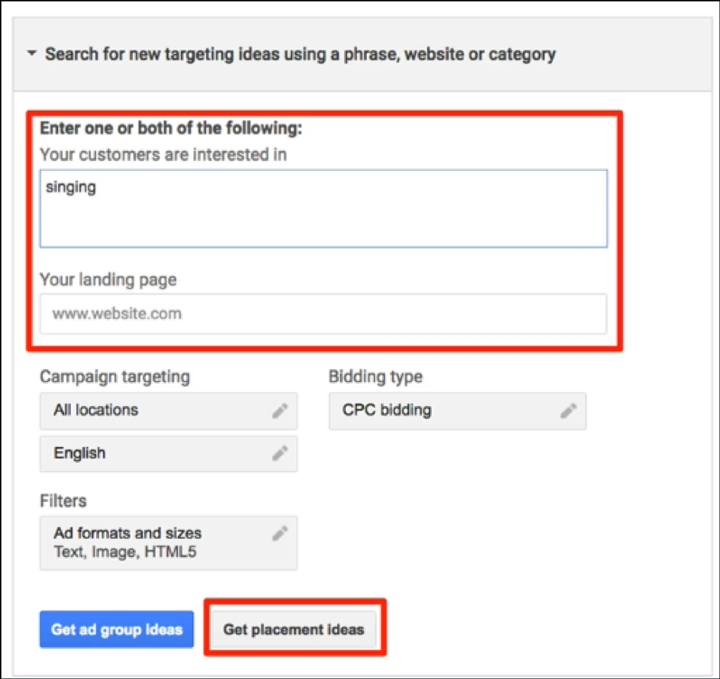
(Keep in mind, you can also enter your competitors’ landing pages here to get even more ideas for managed placements.)
When you click the “Get placement ideas” button, you’ll see a page that looks like this:
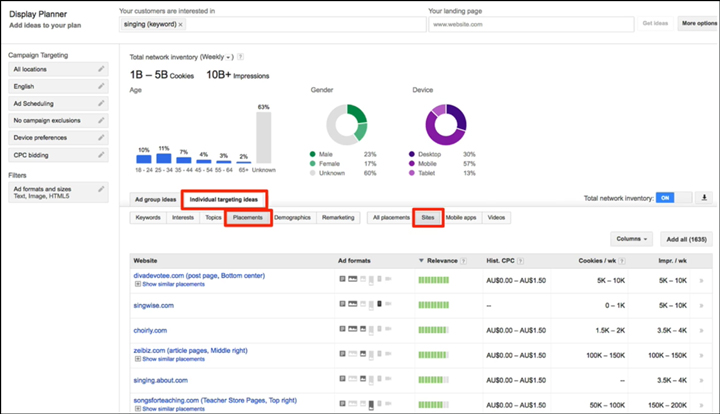
To show your ads on these websites, all you need to do is scroll through this list, find sites that you think will be relevant to your audience, and add them to your plan by clicking the “>>” button on the right.
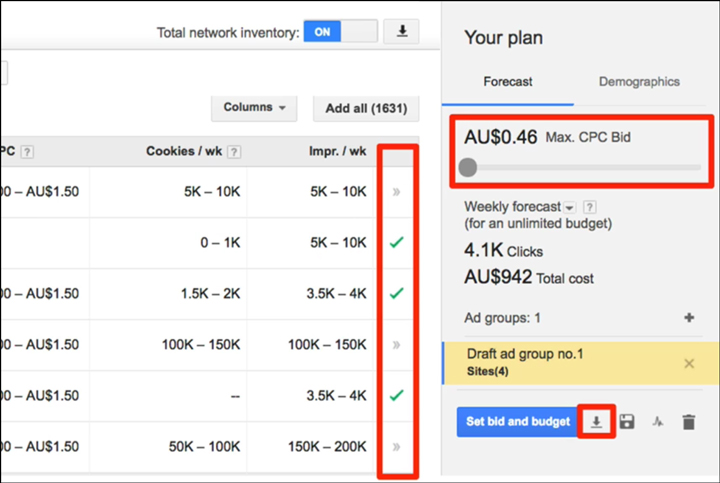
(Or you can click the Download button under “Your Plan” to download the whole list as a CSV if you’d rather scroll through it in Excel):
You don’t want to blindly add all these websites to your campaign because it’s likely that some of the results will be irrelevant to your product or service.
Instead (and especially if this is your first time adding managed placements), take the time to dig through the results and find 6-12 good matches to focus on.
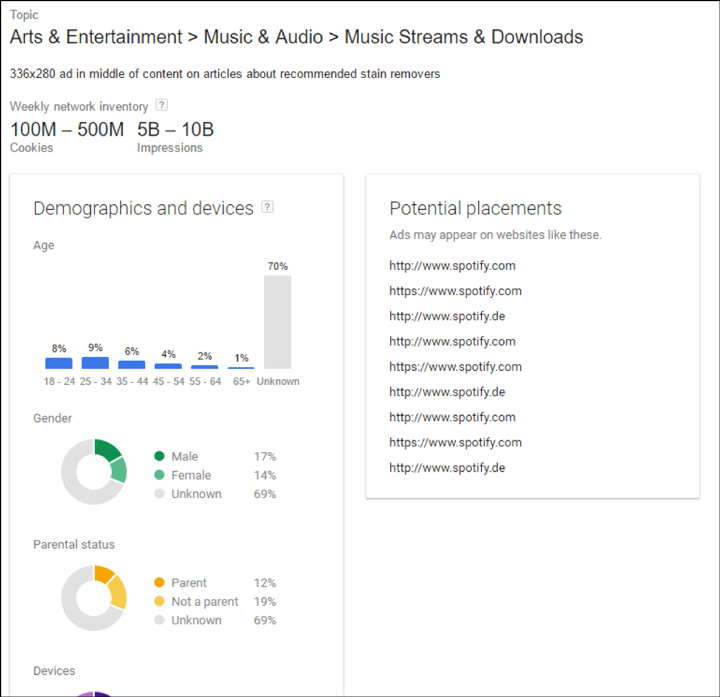
You can click on the name of each site to learn more about their visitor demographics (age, gender, etc.), along with some stats on how much inventory there is and the type of ad formats they support.
It’s also a good idea to visit the website and take a look around to make sure it feels like the kind of place where your market would hang out online.
The Pros & Cons of Managed Placement Targeting
The big benefit of Managed Targeting is that you have TOTAL control over where your ads appear. (You are choosing the sites by hand, after all.)
You can even choose to display your ads on certain sections of sites. So, for example, you could target the entire site www.nytimes.com, or you could target only www.nytimes.com/section/technology to show your ads just to people visiting the “Technology” section of that online paper.
 The downside is that, because adding managed placements is such a manual process, it’s difficult to scale out your campaigns and discover new websites where your ads might perform well.
That said, if you’re new to the Display Network, then Managed Placements is a safe way to get started because you can be assured that your ads will be showing up only on relevant websites.
But when it’s time to start really scaling up your campaigns, you’ll need to expand your targeting to include Contextual and Behavioral Targeting.
Contextual Targeting
This is where you show your ads based on the context in which they’re being seen.
Think of the context as basically being the content on the website. (Just think content=context.)
Here’s an example of contextual targeting at work:
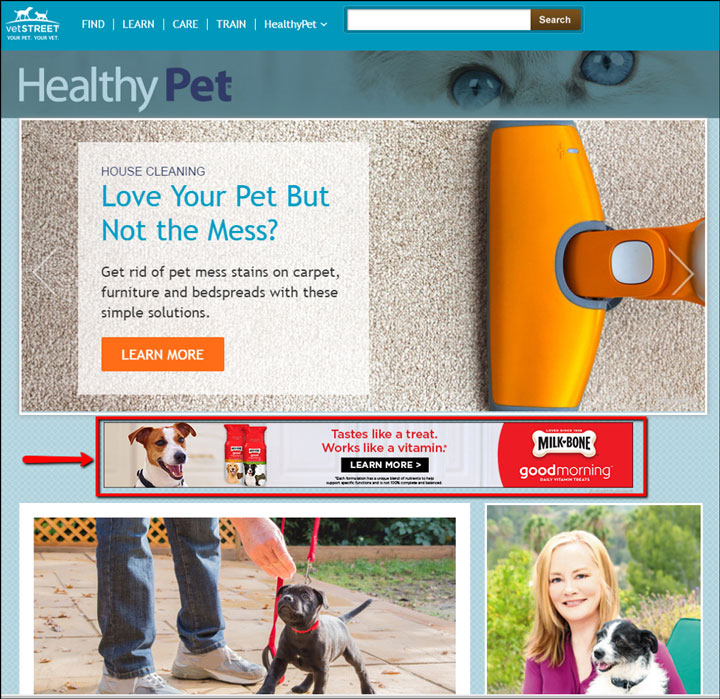
Here you see an ad for healthy dog food being displayed on a website called “Healthy Pet.”
Makes sense, right?
Contextual targeting is a powerful strategy because it allows you to display your ads on websites that are relevant to your product or service, without having to manually pick them yourself.
(Remember, there are over two million websites on the GDN… so there’s no way you could manually choose all the relevant sites yourself.)
So how does it work?
There are two different ways to do contextual targeting: You can target by keyword or you can target by topic.
Contextual Targeting with Keywords
When you target websites based on a keyword, you’re basically telling Google: “Go find web pages where the overarching theme of that page is about this keyword.”
For example, if you sell “dental dog treats” then you would want to show your ads on pages that match the keyword “dog dental treats.”
You might also want to target related keywords like “dog treats for teeth,” “healthy dog treats,” and “dog teeth cleaning bones.”
If you want to get a little more advanced with your keyword targeting, you can categorize your keywords into three main buckets:
- Branded Keywords
- Competitor Keywords
- Non-Branded Keywords
Branded keywords are those that include the name of your brand.
This could be the name of your company or a product you sell. If you’re an author, for example, a branded keyword would be any keyword that includes your name, the name of your book, or even the name of a character in your book.
Competitor keywords are those that include your competitors’ brands.
If you’re an author who writes mystery books, then, branded keywords could include the names of other mystery writers and their books.
Why target your competitors?
Because if the visitors to those pages are interested in those other mystery writers, there’s a good chance they’ll be interested in your mystery book, too.
Non-branded keywords are those that include the products and services you sell that do not include a branded term.
These are more broad and general than your branded keywords. Here, our mystery writer might target keywords like “mystery books” or “mystery authors.”
Keyword targeting is more precise than the other form of contextual targeting, which is…
Contextual Targeting with Topics
When you target websites based on a topic, you’re basically telling Google: “Go find web pages where the page is about this topic.”
In general, topics are broader and fuzzier than keywords.
For example, our mystery writer could choose to target the “Books & Literature” topic. It’s still relevant to his product (a mystery book), but in this case the topic is less precise than the keyword “mystery books” because it will include pages that are related to many different types of books (romance books, science fiction books, etc.).
As of this writing, Google has 2,221 topics available, and it categorizes every page into one or more topics. (Most pages probably have more than one topic.)
Because topic targeting is less precise than keyword targeting, you will definitely want to take your time and be deliberate in which topics you choose to add to your campaigns.
How to Add Contextual Targeting in AdWords
To implement contextual targeting, we’re going to head back to the Display Planner results page in AdWords. Just to the left of the “Placements” button, you’ll see buttons labeled “Keywords” and “Topics”:
From here, the process is very similar to adding Managed Placements.
You can click on each keyword or topic to learn more and see information on demographics, inventory, and some example potential placements:
The next way you can target people on the GDN is through what we call behavioral targeting.
Behavioral Targeting
With behavioral targeting, we are choosing to target people based on how they have behaved online. 
And there are two different ways of behavioral targeting: We can target users based on interests or by remarketing.
Interest Targeting
With interest targeting, you show your ads to people based on something they have shown an interest in (through their previous search history).
It can be easy to confuse interest targeting with keyword or topic targeting.
The difference between them is that with keyword and topic targeting, you’re targeting based on the content on the web page (remember, context). You don’t necessarily care who is visiting that web page… you just want to target websites that are relevant to your product or service.
Interest targeting is just the opposite. With interest targeting, you’re targeting based on the interests of the person. You don’t necessarily care about what page the ad is showing up on… you just want to target people who have demonstrated an interest in something relevant to your product or service.
Google breaks up interest targeting into two different types:
- Affinity Targeting
- In-Marketing Targeting
Affinity targeting means you can show ads to people based on their long-term search history to target people who have demonstrated a longstanding interest in something.
Google uses its vast amounts of data to figure out what type of websites you visit over and over again, which types of websites you spend more time on, and so on, to figure out what your interests are.
For example: If you visit sites related to basketball on a regular basis, Google will categorize you in the affinity group “basketball fans.”
Google has about 100 affinity categories.
In-market targeting, on the other hand, is based on people’s recent behavior in the past one to two weeks. In-market targeting identifies people who are “in the market” for a particular product or service.
For example, most people buy a car every few years. So, you wouldn’t necessarily want to serve car ads to all people all the time; a smarter strategy might be to focus on people who have demonstrated that they’re in the market for a new car.
Google has about 500 in-market categories to choose from.
It can be a little difficult to find all the affinity and in-market categories inside of your AdWords account, so to make it a little easier on you I’ve put together a spreadsheet with all your options.
Just go back to TheDisplayGrid.com and click on the tabs at the bottom to view all the current in-market and affinity categories available in AdWords.
Remarketing
The other type of behavioral marketing is called remarketing. In the case of remarketing, the behavior you’re targeting is the visitor’s recent decision to visit your website.
You’re probably already somewhat familiar with the concept of remarketing. But we’re going to get a little more specific and identify the five main types of remarketing:
- General Remarketing
- YouTube Remarketing
- Customer Match Remarketing
- Dynamic Remarketing
- Similar Lists
General remarketing is what most people think of when they hear the word “remarketing.” It means showing your ads to people who have visited your website in the past.
For example, you could remarket to someone who added a product to their shopping cart but did not visit the order confirmation page.
(RELATED: The Remarketing Grid: The Science of Ad Retargeting Audience Segmentation)
If you’re running any YouTube ads, you can use YouTube remarketing to tell Google to create a remarketing list of anyone who has seen your video as an ad.
You can even get more specific by targeting people who have taken a specific action on your video, such as liking it, commenting, or subscribing to your channel.
(This requires quite a bit of volume to pull off, but it ensures you’re targeting only people who have demonstrated an active interest in your video.)
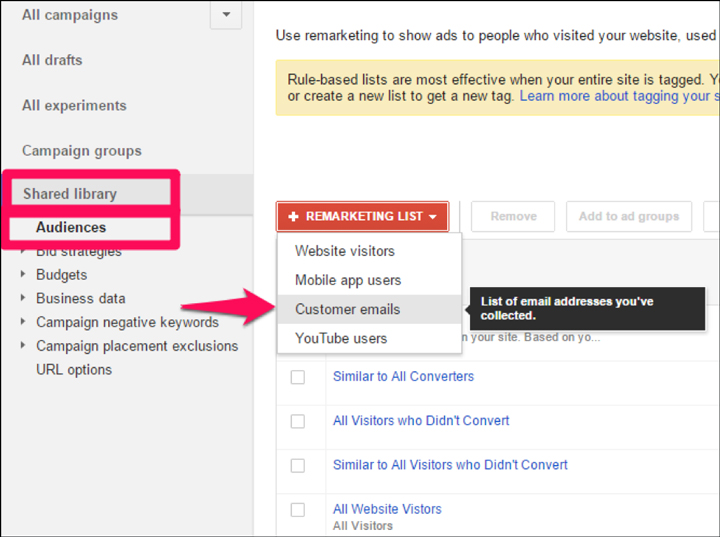
With customer match retargeting, you can upload an email list and target the people that Google recognizes.
This gives you the ability to target people who have subscribed to your email list, regardless of the context of the web page or the person’s Google-defined interests.
To upload your customer email list to AdWords, click on “Shared Library” on the left, and then “Audiences,” “+ Remarketing List,” and “Customer Emails:
Dynamic remarketing is where you display a specific product to a visitor, knowing that they have seen that particular product page on your website.
For example, DigitalMarketer is running dynamic remarketing campaigns on their certification courses.
If you visit one of these pages, like the landing page for DigitalMarketer’s Paid Traffic Mastery Certification Course, then you’ll start to notice ads for that particular course following you around on the Internet.
If you run an ecommerce store, dynamic remarketing will probably be one of your highest-ROI campaigns.
To set up dynamic remarketing, you’ll need a product or service feed (you can tag your site with various plugins from Shopify or Magento to help you do that).
Then, you’ll need a dynamic ad inside of AdWords, which looks something like this:
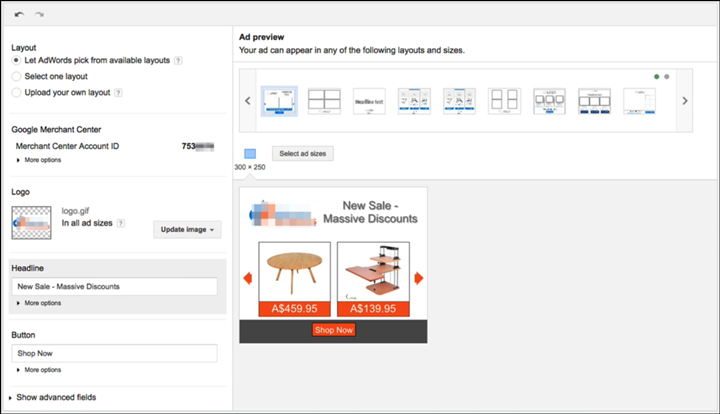
The ad that displays will change based on the various products that the visitor has viewed on your website.
The fifth and final type of Google remarketing gives you the option to use what Google calls similar lists.
This is the same basic idea as Facebook’s lookalike audiences. It tells Google to go and find people who are similar to another one of your audiences.
It’s a good way to scale your campaigns by finding new people who are likely to be interested in your product or service.
And you can create similar lists based on any of the other types of remarketing. So, you can create a similar list based on YouTube remarketing, dynamic remarketing, customer match remarketing, and so on.
Combined Targeting
Finally, your last option is combined targeting. And this is just what it sounds like: It’s where you use a combination of the options above to create an even more tightly focused campaign.
When you use combined targeting, both of the conditions have to be true for your ad to show.
You can think of it like a Venn Diagram, where each targeting method is a circle. When you use combined targeting, you’re targeting only the area of overlap between the two circles:
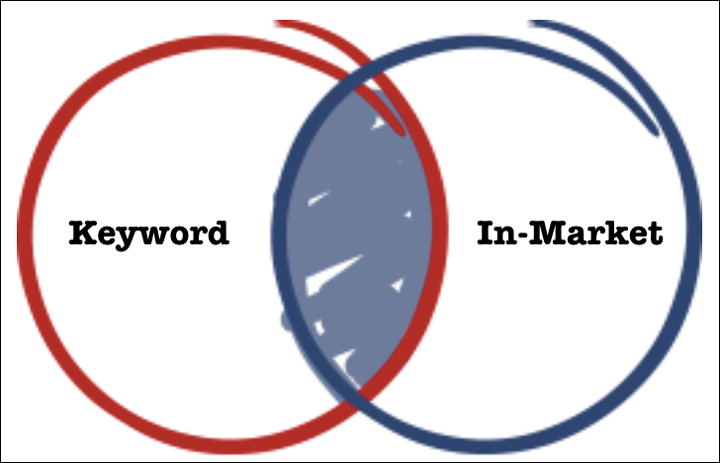
For example, you could target the keyword “basketball drills” + the affinity “basketball fans.”
Here, what you’re saying to Google is, “Show ads where the page is about basketball drills and the person viewing it is a basketball fan.”
It allows you to get even more tightly focused on your market.
You can use any combination of targeting options you like, such as keyword + topic, keyword + in-market, topic + in-market, etc.
The Display Grid: Part 2…
We’ve now covered all the different targeting options inside of GDN, which run across the top row of The Display Grid:

With everything we’ve covered here, you should be looking at the Google Display Network in a brand-new light.
Part 2: GDN Ad Formats and Advanced Tips for How to Use the Display Grid
We’ve now covered all the different targeting options inside of GDN, which run across the top row of The Display Grid:

Now, in Part 2, I’ll go through all the different ad formats, which you can see in the left columns on the grid:

When you put the two together, the resulting table shows you EVERY possible ad + targeting combination possible on the Google Display Network.
Finally, I’ll show you some of the more advanced ways to use The Display Grid to start building effective GDN campaigns and achieve massive scale in your business.
So, without further ado, here are…
The 11 Different Ad Formats on the Google Display Network
The right ad can make all the difference for your GDN campaigns.
It’s not uncommon to see an enormous difference in terms of performance from one ad to another, even when all the targeting options are the same:

This is why it’s so very important to run the best-performing ads possible inside your campaigns.
So, the next question is:
How do you know which ad is going to perform the best?
The unfortunate answer here is… you don’t.
 Nobody knows which ad is going to resonate best with your prospects. I don’t care how much of a marketing expert you are, or how familiar you are with your target market. You never know for sure which ads will work best until you test them.
And that’s why you should always be testing many different variations of each type of ad in your Display Network campaigns.
When you click the red “+ Ad” button inside Adwords, you’ll see a list of all the possible GDN ad types available to you:

Now, let’s dig in and examine each of these possible ad types in more detail:
Google Display Network Ad Format #1: Responsive Ads
This is Google’s current default ad type. And the concept behind Responsive Ads makes a lot of sense:
Just supply an image, a URL, a few lines of text, and Google will automatically resize and add/remove text to make your ad fit in just about any available ad placement:

Unfortunately… I’m not a big fan of responsive ads (at least not yet).
The problem with Responsive Ads right now is that you don’t get enough control over how they display or what the performance was of those ads. I like to be able to specify how I want my ads to appear in more detail—so I know exactly what size it will be, exactly what the text will say, and so on.
Why am I such a control freak?
Simply because I know that the performance of an ad can vary tremendously, even when the only difference is the ad’s size.
For some of our accounts—about a quarter of them—switching to Responsive Ads improved our results. But for the remaining three-fourths of accounts, performance actually got WORSE when we turned on responsive ads.
So, by all means, feel free to test these out in your campaigns, just be aware that you’re liable to get better performance with other ad types. (At least until Google improves Responsive Ads to give you more control over the way they display.)
How to Create Responsive Ads
When you click “+ Ad” and “Responsive Ad,” you’ll be taken to a screen that looks like this:

Here you can supply all the separate ingredients that will make up your responsive ad:
- Short Headline
- Long Headline
- Description
- Business Name
- Final URL
- Images
Then Google will mix and match these elements to fit your ad into many different placements spots across the Display Network.
Google Display Network Ad Format #2: Image Ads
Most people start their display campaigns with image ads, and with good reason.
A good image ad can stand out on a web page, grabbing your prospect’s attention and send a steady stream of engaged traffic to your landing page. And because they come in many different sizes, image ads also have a lot of placement options available.
Now, here’s a little hint to help you create better image ads: When most marketers are getting started, they’ll pay a designer to create one image ad in 14 different sizes.
This is NOT the right approach.
One ad in 14 sizes is still one ad. You aren’t really testing any variations, and your chances of hitting a homerun with your very first ad are very low.
Instead, I recommend choosing just one size—start with the medium rectangle (300×250 pixels)—and have many different ad layouts created for that one size, using a combination of different text and images:

Then, after you’ve found an image design that performs well, you can start to test different sizes.
How to Create an Image Ad
When you click “+ Ad” and then “Image Ad,” you’ll see a screen that looks like this:

As you can see, there aren’t many options here. That’s because you’ll need to have your image ads already created by a designer before you upload them to Adwords.
If you don’t have any image ads created and you want to get started right away, Adwords also has a feature you can use to get started with some quick and easy ads right off the bat. To do that, click “Create an ad” when you see this lightbox:

Next, Adwords will show you a handful of banner ad ideas based on some of the images it finds on your website:

You can use this tool to create your first few banner ads in a matter of minutes. But if you’re serious about scaling your campaigns on the Google Display Network, eventually you will want to have your own ads created by a professional.
My company, WebSavvy, now offers this service based on all the data we’ve collected spending millions of dollars on ad spend and testing literally tens of thousands of different ads.
Google Display Network Ad Format #3: Expanded Text Ads
Adwords recently retired their standard text ads and replaced them with “Expanded Text Ads,” which give you two headlines along with a description:

This new format gives you more room to write some convincing copy and convince website visitors to click through to your landing page. 
Text ads don’t stand out, visually, the same way that image ads do. But there are some significant benefits to running text ads.
For one thing, text ads are quick and easy to create… which makes them a great way to test new ads quickly and get fast feedback on which marketing messages are resonating with your prospects.
How to Create an Expanded Text Ad
When you click “+ Ad” and then “Expanded Text Ad,” you’ll see a screen that looks like this:

From here, simply add your text along with the final URL of your landing page.
While you’re at it, you might as well go ahead and create at least a handful of different text ads. Write a new ad that focuses on each of your product’s or service’s main features, benefits, and selling points.
Once you find which text ads convert best, you can use the copy from those ads to create a killer image ad!
(RELATED: The Ad Grid: How to Build Traffic Campaigns that Convert Higher and Scale Faster)
Google Display Network Ad Formats #4-6: App, Lightbox, & Video Ads
Other ad options include App, Lightbox, and Video ads. These are beyond the scope of this article, as they’re used by only a tiny small fraction of advertisers.
Google Display Network Ad Format #7: Gmail Ads
This is one of the most commonly overlooked types of ads in the Google Display Network, which is a real shame—because Gmail can be one of the best-performing placements on the entire Display Network.
Gmail ads give you two main options:
- You can show an individual ad (which can contain a YouTube video or an image)
- You can show product images
When you run a Gmail image ad, your ad will show up directly in the person’s inbox like this:

When they click on your “collapsed” ad, they won’t be taken to your landing page immediately. Instead, they’ll see an “expanded” version of your ad:

If they click on this expanded ad, then they will be taken to your landing page.
You can also run product ads from within Gmail:

Very few people are doing these product ads inside of Gmail right now. You know what that means? There’s a big opportunity there for anyone in ecommerce!
How to Create Gmail Ads
To create Gmail ads in Adwords, first, click “+ Ad,” and then, go to the “Ad Gallery”:

From there, go to “Gmail Ads”:

That will take you to this screen, where you can explore all the different types of Gmail ads available:

Once you choose which type of ad you want to create, the rest of the process is pretty straightforward. Just add your text, logo, and images as requested on the next screen:

YouTube Ad Formats on the Google Display Network
Don’t forget that the Display Campaign also handles advertising on YouTube, which is a pretty big deal in its own right (it’s only the #2 search engine in the world  ).
).
Many marketers write off YouTube ads altogether because they don’t have video ads or assets. But you don’t even need videos to get started with YouTube ads!
 YouTube offers four different ad types, and only half of them require a video on your part.
Just be sure, when setting up YouTube ads, to put them in a separate campaign—because you can get much cheaper clicks on YouTube, and you’ll want to keep those campaigns separate to keep your data clean.
Here are the four types of ads you can run on YouTube:
Google Display Network Ad Format #8: YouTube Image Ads
Just as with the rest of the Google Display network, YouTube allows you to place image ads (almost all placements you’ll have access to are the medium rectangle size, 300×250).
Your ad will usually show up next to the video, like so:

If you’re precise in your targeting, your ads will show up next to highly relevant videos—which means the person watching the video has a good chance of being interested in your ad.
Google Display Network Ad Format #9: In-Video Overlay Ads
Overlay ads are another type of image ad. But instead of displaying next to the video, overlay ads actually appear in the video itself (near the bottom, just over the video controls):

Overlay ads are 480×70 pixels and can include an optional companion banner (300×250) if you want both an overlay and a banner ad to display in the same video together.
Google Display Network Ad Format #10: TrueView in-stream Ads
Being a site full of videos, YouTube is probably best-known for its Video Ads. (Makes sense I guess.)
In-Stream video ads are a great way to get your prospects’ attention with a video that is funny, helpful, interesting, or surprising in some way.
There are two main types of Video Ads: skippable and non-skippable. Skippable ads are the most common—these are the ads that run before a video and have a “Skip Ad” button in the lower right:

After five seconds, users have the option to skip the Video Ad and jump straight to the video they’re waiting to watch.
Skippable TrueView Video Ads can deliver a great return on investment, especially because you won’t be charged for people who skip your ad after five seconds.
Instead, you’re charged only when the viewer interacts with your video (such as clicking on one of your call-to-action links) or watches at least 30 seconds of your ad.
Non-skippable ads can’t be skipped, and, because of that, they are usually shorter in length—running 15, 20, or 30 seconds long (although Google announced that they are doing away with 30-second non-skippable ads in 2018).
YouTube also offers a non-skippable six-second video ad called “Bumper Ads.” Both of these types are bought in a different way and it’s totally fine to ignore these for now.
Video ads are the MOST difficult and time-consuming type of ad to create, so unless you are already doing video, I would recommend getting started with text and image ads first.
Once you nail down which marketing messages are the most effective, you can translate those messages into video format and really scale your campaigns on YouTube.
Google Display Network Ad Format #11: Video Discovery Ads
This type of ad allows you to promote a YouTube video in “places of discovery,” which includes YouTube search, alongside relevant YouTube videos, and on the mobile homepage of YouTube.
Here’s an example of a YouTube Discovery Ad:

When you click on the ad, you can go one of two places: to the video’s normal “watch” page, or to the advertiser’s Channel page with that video loaded at the top, like this:

Because these ads require the visitor to click on them, they typically bring in highly engaged traffic.
How to Use the Display Grid to Scale Your Adwords Campaigns
We’ve now covered all the different targeting and ad type options available to you inside of the Google Display Network.
Phew!
When you look at the Display Grid, you can see that every combination of ad type + targeting options gives you one square in the grid:

This grid shows you every possible combination of ad and target type inside the Google Display Network. Altogether there are 147 different combinations.
Now, at first, that number might sound intimidating. Does that mean you have to open up your Adwords account and create 147 different campaigns?
Thankfully, no. Because depending on your business, market, and offer, some combinations will make sense more than others.
So, the next thing I want to do is help you narrow down your options, so you can get started with the most effective campaign types.
And to do that, there’s a thirst-quenching acronym I like to use, called:
The “BEER” Formula
Don’t worry, I’m not actually going to start drinking a beer right now.
(OK… actually I am. )
But there’s another BEER I want to go over now too, and this one is going to help you to find the most profitable GDN campaigns as quickly and efficiently as possible.
B: Bullseye
When I say “Bullseye,” what I mean is this:
Start with what is most likely to be profitable. 
So, what IS most likely to be profitable?
The answer will vary somewhat from business to business, depending on what market you’re in. But as a general rule of thumb, your best bet is to get started with these targeting options:
- Remarketing
- Customer Match
- In-Market
- Contextual
- Affinity
Assuming you already have traffic coming to your site, Remarketing is almost certain to be your lowest-hanging fruit. If you aren’t remarketing, you’re leaving money on the table.
(RELATED: The Remarketing Grid: The Science of Ad Retargeting Audience Segmentation)

After setting up remarketing, your next step should be to set up Customer Match. This allows you to show ads to your buyer list, which should generate a TREMENDOUS ROI on your ad spend.
Once that’s done, you should also create a separate campaign targeting people who are similar to your customer list.

Next, take a look through the in-market categories to see if one applies to your business. If it does, this is a great way of targeting people who are in the market for your product or service.

Remember, you can browse through all 500+ in-market categories by clicking the “InMarket” tab at the bottom of TheDisplayGrid.com:
(RELATED: 3 Advanced AdWords Tactics That Increase ROI)

When you’ve finished taking advantage of in-market targeting, next it’s time to turn to contextual targeting. Your ads will be shown alongside relevant content, so these ads should bring you a steady stream of highly engaged traffic.

Finally, notice that #5 on the list above (affinity) is crossed out.
Generally speaking, you don’t want to use affinity targeting on its own. Feel free to test it in combination with other targeting methods, but by itself, it’s just too broad. It often leads to your ads showing up all over the Internet, resulting in some of your least profitable Display Network campaigns.
And to help you find the “Bullseye” in your campaigns, here are a few more targeting tips that make up the happy acronym GLAD:
- Gender: If your product is particularly skewed to one gender or the other, you should start by only showing your ads to that one gender (at least for now).
- Location: Is your product capable of being sold all around the world? That’s great. But it doesn’t mean you should target the entire world. Instead, use the 80/20 principle and start by targeting just the U.S. Heck, start by targeting just California, or San Francisco. The GDN is such a huge network that you can begin with very tight targeting and still generate TONS of traffic.
- Age: If your product skews to a certain age group, start by excluding all other age groups. Selling women’s fashion for 18-25-year-olds? Don’t show ads to anyone over 25. Selling travel insurance for seniors? Don’t show ads to anyone under 55.
- Device: If your audience has an up-to-date phone, you can target them specifically by their device. Selling iPhone accessories? Only show your ads to people using an iPhone.You can also use this information to target desktop/mobile users in general. After you get a little data, you may find that your campaigns perform better on either desktop or mobile. If that’s the case, then only run your ads for those users!
E: Epic Automation
Automation is a great way to improve your campaign performance while also saving time.
Here are some of the things you can automate in Adwords:
- Spend
- Placements
- Ads
- Reporting
- Analysis
And here are some of the tools you can use to do this automation:
- Auto rules inside Adwords
- Scripts
- PPC Samurai
- Optmyzr
Here are a few examples of some easy-to-set-up automations to get you started.
An Example of Automating Ads
When automating your ads, look at cost per acqusition (CPA) first and foremost.
Using the auto rules inside of Adwords, you can choose to pause any ad when it reaches a certain amount of spend without generating any conversions. Here’s an example of an auto-rule that will pause any ad that has spent $20 with zero conversions:

So, when, exactly, should you pause a poor-performing ad? (Or ad group or campaign?)
First, you’ll need to decide on your target CPA. For this example, let’s say your target CPA is $10. From here, my recommendations are pretty simple:
- Pause any ad with a CPA that is twice your target CPA. (In this case, pause any ads with a CPA of $20 or more.)
- Pause any ad group with a CPA that is 3x your target CPA. (In this case, pause any ad groups with a CPA of $30 or more.)
- Pause any campaign with a CPA that is 5x your target CPA. (In this case, pause any campaign with a CPA over $50.)
An Example of Automating Placements
As your campaigns start to generate data, you’ll start to discover placements that don’t perform well.
Please don’t try to go through all your placements by hand, though. There will be way, way too many to go through manually.
Instead, I like to write a simple script to pause poor-performing placements automatically. You can schedule it to run every day, or even hourly, to minimize any wasted spend on these poor-performing placements.
Here are some of the things you’ll want to look out for when automating placements:
- Unusually high click-through rate or cost per click (this could be click fraud)
- High spend with no conversions
- High CPA
E: Expand the Winners
By this point, you’ve got at least 6-12 campaigns running. Some of them will be very profitable, some will be borderline, and others will be losers.
What many marketers do at this point is to focus on the losing campaigns, trying to fix them.
This is the wrong approach!
Instead, you want to pause the big losers and work on scaling up the campaigns that ARE working.

For example, if you have 10 keywords that are bringing you a great CPA, add 100 more! Make sure to include every variation on your most profitable keywords. So, if “fast company” is a keyword, try all these variations:
- fast company
- fast company com
- fastcompany.com
- fast company site
- fast company magazine
(Make sure to put every keyword in a separate ad group, so that you can find the best-performing ad for each keyword separately.)
R: Repeat
OK, so you’ve started with the campaigns that are most likely to be profitable…
 You’ve automated everything possible to cut down on your manual work…
And you’ve expanded your winners to scale up.
All that’s left to do now is repeat the process again using a new square from The Display Grid!
This gives you a repeatable process you can use to scale your campaigns, over and over again. There’s almost no limit to how much scale you can achieve using this method.
One Final Thing to Keep in Mind
To profitably scale your campaigns on the Google Display Network as quickly and efficiently as possible, you’re going to have to FAIL. A lot.
Get comfortable with it.
The most successful media buyers are the ones who aren’t afraid to fail. Instead, the actively seek out failure…
…because they know they have to find the losers in order to find the winners.
So, don’t be afraid to fail. Be bold, and know that you will create some losing campaigns.
But in the process, you’ll also find the winning ad + targeting combinations that will help you achieve massive scale in your business. 
Hopefully, the Grid has given you a different way of thinking about scaling up your campaigns, along with some new ideas to get better results from the Google Display Network.
The post [Parts 1 & 2] The Display Grid: How to Scale Your AdWords Display Campaigns Profitably with Laser-Focused Targeting and the Right Choice of Ad Type appeared first on DigitalMarketer.
]]>The post 3 Advanced AdWords Tactics That Increase ROI appeared first on DigitalMarketer.
]]>This article is for those looking to expand their knowledge of AdWords and take their remarketing campaigns (aka retargeting) and targeting methods to that “wicked smaht” level.
These advanced tools can help you get there.
We’re going to take a deep dive into…
- Remarketing Lists for Search Ads (RLSA): An incredibly potent tool that combines the power of remarketing with your search campaigns (hint — very few advertisers are using this feature, and it’s almost guaranteed to make money for you).
- Affinity Targeting: Google knows what you like, and what everyone else likes. With that knowledge, Google has organized people into groups, giving marketers plenty of behavioral targeting to utilize for your display ads.
- In-Market Targeting: This is another behavioral targeting feature for display ads… and it’s even more powerful than Affinity. In-Market displays who’s “in the market” to buy specific products and services—right now.
Harness the power of these advanced tactics, so you can increase your leads and lower your cost per acquisition (CPA). Like we did for this client:

Not only that, these advanced tactics can help you save time, help you make predictions, and help you draw correlations.
Let’s get started.
Remarketing Lists for Search Ads
RLSA is a way of combining the power of remarketing with your search ads, which will allow you to get more out of the existing ads you’re currently running.
RLSA helps you put your search ads in front of the right people, so you can use people’s previous behavior to make better decisions about the ads you show them and how much you pay for the ads.
Let’s start with how RLSA can get you more out of the existing search ads that you’re already running.
Using RLSA, you can up your keyword bid for those on your remarketing list, which is especially powerful if returning users to your site are more valuable to you and convert more.
(RELATED: The Remarketing Grid: The Science of Ad Retargeting Audience Segmentation)
In this example, let’s suppose you’re paying a $1 for the keyword phrase, “buy xyz online.”
If someone were to click on this ad and visit your site, you’re obviously going to cookie them, and add them to your remarketing list(s).
Now, if this person leaves your site without buying anything and is still searching for “buy xyz online” – as many people do as they continue their research and evaluation – you can up your bid on this person in an effort to bring them back to your site.
So this is how you do it…
You’ll need to go to the Audiences tab in AdWords, and the first thing you need to do is choose an Ad Group:

This is one of the most annoying things about RLSA – it’s super powerful, but you have to add one Ad Group at a time.
We’ll talk about AdWords Editor in just a minute because it’s a much faster way to do it.
Once you pick an Ad Group from one of your search campaigns, a new screen will come up. The bit we’re interested in is Ad Targeting at the top…

Then you’re going to choose Remarketing from the dropdown list…

Next, you’re going to find and choose from your existing remarketing list(s). And my tip for you, is to use a relatively broad list. Here you can see, we’ve selected All Site Vistitors – 90 Days…

Now, you may know there’s all sorts of remarketing lists that you can set up, but you don’t want to do this when you’re just getting started, and certainly not with RLSA, because it would be too restrictive of a list.
Only a handful of people would be affected by your RLSA campaign.
So you want one narrow thing and one big, broad thing when building your RLSA campaign – the narrow thing being the keywords that you already have, the broad thing being your remarketing lists.
Using “All Visitors 30 Days” or “All Visitors 90 Days” is a perfect place to start.
This is critical: Double check you’ve selected the Bid only setting in the bottom. We’ll take more about Bid only and Target and bid and the differences between the two, but for now, pretend Target and Bid doesn’t exist.
Once you’ve done that, you’ll be back on the Audiences screen, and here you can see the audience that was just added.
The next step is to set a Bid Adjustment (a.k.a. bid modifier).

It’s really good practice to set Bid Adjustment straight away, even if you just put in 0%. Setting a Bid Adjustment is a good way to check that you’ve got everything set up properly.
Selecting 0% tells AdWords to do nothing different.
AdWords will split your traffic in half – it’s going to show ads to everybody that’s not on the remarketing list and bid (let’s say) a $1, and it’s going to show your ad to everybody that’s on your remarketing list and do exactly the same thing: Bid $1. At 0%, you’re getting two lines of data, and you can check if your ad is working and set up correctly.
As you start to see more data, you can start to increase your bid accordingly.
I’d suggest a conservative Bid Adjustment would be between 10-50%. For instance, if you raised your bid to 25%, a $1 becomes $1.25 towards your retargeting list.
Google would have you do 100% or 200% Bid Adjustment, in other words, double or triple your bid for those returning customers. I’d wait until you’ve got a little bit of data to back that up – is a returning customer really worth 3X as much to you?
Let the data tell you how aggressive you should be with your Bid Adjustment.
Now, rolling out RLSA when you have lots and lots of ad groups is a real pain in the you-know-what because you have to make this change and go through the above steps I just described for every single Ad Group.
And we’ll talk about…
How to Set Up RLSA with AdWords Editor
If you have more than one ad group, AdWords Editor is almost a necessity.
AdWords Editor will save you hours and hours of time by allowing you to set up your RLSA in bulk, and it will help you get more out of the existing ads you’re currently running.
Just know, AdWords Editor does have a learning curve, but it’s worth learning. If you aren’t familiar with Editor, I’d suggest you do go to their Help Center before you start applying this method.
In AdWords Editor, you’ll see this…

- In the top left corner, we have a list of campaigns, and whatever campaign you highlight there is the one you’re working on.
- In the bottom left, you’ll choose the type of entity you want to work with. (We’ll continue to use Audiences in our example, like we did in the previous one.)
- On the right hand side in the larger screen is where you do the work in AdWords Editor.
So what I’ve done in the example above, and what I suggest you do, is set up the first RLSA Audience in the interface.
Next, I opened AdWords Editor and downloaded the recent changes, and then I see, under the Audiences tab, what was just created in the interface.
This is a good starting point because it helps orient yourself instead of attempting to create it all from scratch in Editor.
Now we’re going to add an audience by clicking Add Audience at the top…

We choose the ad group(s) – 38 in this case – we’re going to add our audiences to…

Hit OK. Now, you’ll add the remarketing list.
You can choose more than one list, but we’re only using one for this example. In this case, it was All Site Visitors – 90 Days…

Now, all that’s left is to set your Bid Adjustment…

In under a minute I’ve added 38 Ad Groups. I can highlight all of them and set the bid for all of them at once. That’s the power of Editor.
So we’ve just gone through the steps to add an ad group to audience and set the Bid Adjustment.
The final step requires making a little change. You’ll go to Ad Groups, in the left corner above Keywords and Targeting, and then highlight all the ad groups in the right hand window…

Go to second tab and click Flexible Reach. And you’re going to change Interests and remarketing to Bid only.
The Bid only setting is applied at the ad group level, so it’s not connected with the audience. You add the audience to all the ad groups you want to, and then you need to “flip the switch” at the ad group level. That’s it.
Another great thing about Editor is it has a safety net.
Anything you’ve done in Editor that you want to go live must first be sent back to AdWords by selecting post your changes. If you don’t post your changes, it will stay in Editor, so you can’t break anything while you’re in Editor.
Before I get into other ways to use RLSA, how do you go about…
Measuring Success
If you’re going to apply RLSA to your campaigns, you need to know what to do next – you need to know how to read the numbers, and how to report the numbers back to your client or back to your boss.
We’re going to take a look at a purchase for a brand campaign with four different audiences…

But what do all these numbers mean?
Take a look at what I’ve circled in the bottom right. The left number, $2.93, that’s the CPA for our remarketing search ads. The number under that, $3.96, is the campaign as a whole. Our RLSA conversion rate is represented by the first number on the right, 7.07%.
For the campaign as a whole, the conversion rate was 4.91%.
This looks great! It looks like we’ve got a conversion rate increase of 48%, and we’re saving about a buck on every lead that we’re driving in.
But there’s data missing here.
Until you understand this you really won’t see the power of RLSA, and you’ll be doing yourself a disservice when you report the numbers. That’s because campaign as a whole is made up of two different groups: The remarketing audience that we increased our bid for combined with the rest of the audience you’re targeting.
What we don’t yet know is: What’s the actual data for that NON-Remarketing audience?
You’ll have to split it apart and do the math manually to get your true number.
The campaign as a whole received 5,529 leads, which you can see in the Converted Clicks column. You’ll subtract Total – Eligible Audiences (2,508) from Total – Search (5,529).
5,529 – 2,508 = 3,021
So 3,021 leads came from people that haven’t been to our site before. (Our NON-remarketing lists if you prefer.)
If you separate the data out and do the math, you actually find the conversion rate for the 3,021 is 3.9% and they actually cost $4.82.
So the real improvement by adding the Remarketing Audiences in, is from $4.82 down to $2.93.
And we’ve improved the conversion rate from 3.9% to 7.07%.
Those are the numbers you’ll want to report to your boss or client!
Now, I want to talk about a few options for…
Target and Bid with RLSA
Target and bid works differently than Bid only, so if you’re new to this, start with Bid Only. You’re less likely to break anything.
Let’s go through three use cases.
1. “Top of Funnel” (TOFU) Keywords
TOFU keywords are very broad, very generic keywords, like “TV” or “Costa Rica.” They’re keywords that don’t show intent, and generally are keywords you don’t bid on because they don’t help your ads convert.
However, if a person has been to your site, and then does a broad, TOFU keyword search that’s related to your business, then it may be a good time to target them with your ads.
This strategy can work because the prospect has been to your site and is familiar with you.
For instance, let’s say you sell TVs and there’s a prospect that’s been to your site before. If the prospect is in the market for a TV and does a TOFU keyword search that triggers one of your ads, then the prospect is more likely to click on your ad because they’re already familiar with you.
By using Target and bid, you’re saying to Google: Only target people with these TOFU keywords if they’re on my remarketing list; if they’re not on my remarketing list, don’t show them an ad. Then you could set your bid amount ($1, for example).
To use this strategy, I’d advise setting up a new campaign. Pick broad, but relevant, TOFU keywords you’re not currently using. Set Target and bid, and test it.
2. Change Ad Copy
You can use Target and bid to show different ad copy to someone that’s already been to your website.
Let’s say you’re in the cleaning industry, and someone has been to your site, but they didn’t book an appointment.
If they’re still in the market for a cleaner, which you’ll know based on their keyword searches, instead of bidding more for returning visitors you could change your ad copy to, “Still need a cleaner?” and target that person on your remarketing list.
“Still need a cleaner?” is direct and will probably speak to a person who’s still searching for a cleaner.
The only way to change the ad copy is to set up a new campaign and use the Target and bid option. This will allow you to show this ad to the targeted people on your remarketing list.
For this new campaign, if you like, you can use the same keywords from the previous campaign that got the prospects to your site in the first place.
3. Competitor Terms
Within the Google system, you can go after any keyword, trademarked or not.
You just can’t use those trademarked keywords in the copy, nor can you use deceptive and misleading copy and pretend to be that competitor. But, if you can get an honest ad in front of a lead that’s about to go to your competitor, you can grab a little bit of your competitor’s traffic and bring it over to you.
This strategy generally converts very, very well. Competitor Keyword Campaigns are usually the second most profitable terms you can run (with Brand Campaigns being the first most profitable).
However, the challenge with running Competitor Terms is that they have a very low click through rate (CTR) and therefore a low quality score (QS). This causes you to pay a high cost per click (CPC) with a low impression share.
In other words, Google wants to charge you more and show your ad less because it knows you’re not really relevant for that term.
To improve your low CTR and high CPC on Competitor Terms is to use RLSA and the Target and bid option.
Limit your competitor ads to only show to those on the remarketing list. When the cookied (a.k.a. pixeled) lead searches for your competitor, show them your ad. Because these people already know you, and because you’re only showing your ad to a small group, your CTR is pretty decent. Thus, your quality score goes up, and your cost is very good.
Using RSLA to Exclude Audiences
You can use your remarketing list to stop showing ads, as well. That’s something that previously had not been possible.
How do you do that? How do you stop showing ads to select audiences? It’s very simple to set up.
In AdWords, go to the Audiences tab and scroll down to Campaign exclusions, and choose Remarketing lists from the drop down menu…

In this case, our client has an advertiser portal on their website. So we know that anyone that goes to the advertiser center is an advertiser, and we don’t want to show them paid ads. So we’ve added this exclusion to every search campaign, and we stop showing ads to these people.
Google Shopping Ads
You can combine RLSA with your Google Shopping Campaigns, and it’s super simple to do.
(RELATED: Selling Physical Products? Scale Up With These 6 Google Product Listing Ad (PLA) Tips)
In the Shopping Campaign you’ll start out in the Audiences tab. You pick an ad group. In my experience, most people only have the one ad group, All Products. The example below has multiple ad groups because that’s how we’ve set up this campaign for this client…

Pick your ad group, then select Remarketing (at the top) and add which ever remarketing lists you want to treat differently. In the screen shot below, you’ll see I’ve picked a few remarketing lists…

And finally, choose Bid only.

In this case, it’s key that you select Bid only. If you choose Target and bid, your ads will only show to those who have been to your website, which is generally not a good thing because Shopping is typically an acquisition strategy. So use Bid only to acquire new blood.
The results of this Shopping Campaign can be found below. This site typically has a conversion rate of 2-3%, but this campaign resulted in an 8.88% conversion rate for site visitors in the past 30 days (All Site Visitors – 30 Days) and a 25% conversion rate on those that abandoned the cart (Added to Cart Visitors – 30)!

Next, I want to talk about…
Using Dynamic Search Ads (DSA) with RLSA
This is a way of automatically showing ads to people that Google thinks are a good match to you based on what’s on your site.
If you’re not targeting a particular keyword, Google will match you to it based on your website, write the copy, set the bid (within reason), for you, and show the ad to the prospect.
It’s kinda a catch all strategy.
DSA will catch things that your current campaign(s) may miss, and it can be incredibly profitable.
You can mix DSA with RLSA. This lets you bid more for all the things you’re about to miss, but for people that are familiar with you and on your remarketing list(s).
If you’re already using DSA campaigns, no need to make a copy of it. Use Bid only when setting up the audience, which will tell Google to keep using the DSA campaign, but now bid higher for returning visitors.
Set it up and give it a try. It’s a powerful tactic.
That’s the final topic I’m going to cover on RLSA. Now we’re going to move on and talk about a couple of behavioral targeting options. Let’s start with…
Affinity (and beyond!) Targeting
Not “infinity,” but “affinity.” Dad joke – couldn’t resist. 
In AdWords, there used to be a feature called Interest Targeting. Affinity Targeting and In-Market Targeting, which we’ll talk about in the next section, have replaced Interest Targeting.
Affinity is much like how TV advertising has been sold for years – the audience is broken down into groups of people with similar interests.
The reason they can break audiences down is because Google knows everything about us. They use people’s search behavior, browsing behavior, websites that people visit, where people use their phones, people’s Gmail accounts, and so on. Google does this to show a better quality ad – so that advertising can be informative and not annoying.
Affinity is a long term “interest,” so it’s more about reach than ROI. It’s not about what they’re “watching” right now, but what they “watch” often. I’m still making the analogy to the TV – by “watching” I mean what websites they’re on. Affinity is about behavior that the audience does again and again over time.
Affinity groups are pre-defined segments of audience and these groups include…
- Sci-Fi TV Fans
- Luxury Shoppers
- Avid Investors
- Snowbound Travelers
- American Football Fans
…and many, many more.
Using Affinity will help Google display ads to people who display relevant behaviors to what you’re selling.
You set up Affinity through Display Network. I’m assuming you have an understanding of Display Network, but you can read more about Display Network in this blog post and in AdWords Support.
This is a targeting option that you have for your Display Network Campaign. This is an ad group level setting that can be applied to loads and loads of ad groups using Editor. To set this up, go to Display Network, then Targeting, then Interests & remarketing…

At the time this post was written, there were 106 Affinity audiences to choose from. I’ve made a list of Affinity segments you can choose from in Dropbox, which you can access here. The best thing to do is scroll through the list and see what will work best for your brand.
Even more powerful than Affinity is…
In-Market Targeting
In-Market works similarly to Affinity, and per before, can be found under Display Network in Interests & remarketing. There’s about 500 lists (see the full list here) to choose from with In-Market…

The critical difference between Affinity and In-Market is this is what people are in the market for, right now — roughly in the last 7 to 14 days. People have been searching or browsing for this in the last week or two, and you can target people based on this.
For instance, you can target people who are in the market to buy an Audi. Not just people who are in the market to buy a car, but the brand of the car. In-Market allows you to get specific.
Let’s walk through an example of how you can use this. For this example, I’m using an eCom site that sells contact lenses.
You’ll do this in Google Analytics (and again, I’m assuming you know how to use Google Analytics and that your Analytics is set up properly.
(RELATED TRAINING: How to Master Google Analytics)
You go to the Audience section inside Analytics, then down to the Interests section, and you’ll see In-Market.

You get a table that looks like this…

…but it’s not particularly useful. Let’s tidy that up.
If you go to the top right of the chart, you can click the Comparison Report…

…and from the drop down menu, you can find options that are more useful for your business.

Now we’ll get a much more useful report…

The green lines on the right hand side show the eCom conversion rate compared to the average. The first red box shows a 14.84% better conversion rate compared to the average of 5%.
You have this data right now in your Analytics account. Google is storing this information about your current visitors and telling you what they are in the market for, right now. This allows you to see patterns and correlations with people who have visited your site.
Through this In-Market report, we discovered that people who buy contact lenses from this client were also in the market for travel – just before people went on trips, they stocked up on contacts. Blindingly obviously in hindsight, but we had never thought of this before.
So what can we do as a result of that?
We can target people who are in the market for travel, and we can show them an ad like, “Traveling soon? Need to stock up on contact lenses?”
Now, not all of the people traveling will need contact lenses, but for those who are in the market for both travel and contact lenses, that will be a compelling ad. We could even bid differently and target people who have been to our website using the RLSA tactics discussed above.
Powerful.
The post 3 Advanced AdWords Tactics That Increase ROI appeared first on DigitalMarketer.
]]>The post The Remarketing Grid: The Science of Ad Retargeting Audience Segmentation appeared first on DigitalMarketer.
]]>It applies to Facebook, AdWords, or any other platform and will help you picture the different audiences that you need to target.
To really get a firm grasp on the Remarketing Grid, this post will be broken into 3 parts.
View the parts of this article by clicking on one of the links below to view the blog post ideas from that section:
- Part 1 – How to Set Up a Remarketing Grid
- Part 2 – How to Put The Remarketing Grid into Practice in your AdWords and Facebook Accounts
- Part 3 – Advanced Remarketing with Google Analytics
Need a primer on ad retargeting? Read this first.
The Typical Remarketing Setup
Most AdWords and Facebook accounts have a remarketing list that captures all visitors in the last 30 days. This is the default that both platforms provide.
It looks like this inside your AdWords account:

Let’s visualize it like this…

A typical site visitor will stay on this list (also called an audience) for 30 days, and then at 31 days they’ve “fallen off” your remarketing list.
It looks like this…

The only way the visitor doesn’t fall off the list is if they return to your site, at which point they get added to the list all over again.
Make sense?
Remarketing Segmentation: By Behavior
Here’s where the grid begins to take shape. Start by segmenting your list by behavior. And for our purposes there are 3 groups of visitors.
- Not Interested
- Interested
- Buyers/Converted

We’re not really interested (yet) in paying for remarketing ads to reach people who’ve already bought, or the people that didn’t like what you have to offer.
So don’t add those 2 groups to your list.
Here’s what your custom audience will look like in Facebook…

We’ll dig into this in more detail in parts 2 and 3. For now, think of interested visitors as those that have visited a particular part of your site.
If you’re a lead generation site, this might be someone that’s read about your services, or a particular blog post.
If you’ve got an ecommerce store it might be anyone that’s been to a particular product page, or the checkout page.
It’s also worth noting that the “Not Interested” group might be half, or more, of your traffic.
So, NOT showing ads to these people means that your results are likely to increase as only the best prospects will now see your ads.
By NOT showing ads to the “Not Interested” group you will
- …improve click thru rates and engagement…
- …which improves your quality scores…
- …which causes ads to show more often and decreases costs!
Remarketing Segmentation: By Time
One of the greatest predictors of future behavior is past behavior and, especially, the RECENCY of that past behavior.
If you visited the gym and worked out yesterday, you are much more likely to visit the gym again very soon. Much more likely than someone that hasn’t visited the gym in 14, 30 or 365 days.
Recency of behavior can predict just about anything.
If you smoked today, you’re more likely to smoke tomorrow than someone that hasn’t smoked in 6 months. If you buy furniture for your home today, you are much more likely to buy more furniture (and soon) than someone that hasn’t bought furniture in over a year.
Get it?
So, one of the most powerful ways to segment your remarketing audiences is by RECENCY.
Here is the Remarketing Grid segmented by time…

The times in this image are just an illustration, you’ll use whatever timeframes make the most sense for you based on how people buy from you and what your sales cycle looks like.
But one thing (almost always) remains constant. The most RECENT members of your audience are more likely to buy than those that are less recent.

It stands to reason that this group is more likely to buy than the person that left your site 60 days ago or 300 days ago! We therefore want to spend the bulk of our remarketing budget here.
There’s another benefit to segmenting by time. And that’s changing the creative—the ad that users on the list actually see.

For example…
- Ad Number 1: Sent to visitors in the 0–3 Days audience—a standard remarketing ad
- Ad Number 2: Sent to visitors in the 4–7 Days audience—special offer or discount
- Ad Number 3: Sent to visitors in the 8–14 Days audience—”buy 2, get one free” or perhaps changing the style of the ad—a testimonial ad or a social proof ad. And if you still have no luck…
- Ad Number 4: Sent to visitors in the 15–30 Days audience—a deeper discount or an even better offer
The only limit here is your imagination.
Segmenting by time also lets you reduce how much you bid over time. If the most recent visitors are more likely to buy, then as recency decreases so do your chances of getting the sale. So it makes sense to pay less for these segments that are less likely to convert.

In this case the 0-3 day segment is going to get a much bigger bid than the bottom end, the 15-30 day audience. Fish where the fish are!
Don’t Ignore the Buyers!
You can remarket with an upsell or cross-sell to your buyers, but you’ll want a separate list for that.
With this setup we are targeting those that visited our ‘checkout success’ page (or thank you page) which indicates that they bought something.

You can show upsell ads to everyone that bought on your site in the past 365 days.
You can also create a similar audience (called a “lookalike audience” on Facebook) where Google compares all the information that they know about those people that bought from you and builds a list of people similar to them.
You can then show ads to those new groups.
Use similar audiences with caution. A “previous buyers” list is a great place to start.

A similar audience looks like this in Adwords:

Using “Occasional Ads”
Here’s a variant of the remarketing grid that we’ve had great results with.
Show your ads for a period of time, and then turn them off for a period of time.

You’ll notice that the time frame has changed—again this is just for illustration purposes.
In the above example, ads will be shown for the first 30 days, and then stopped. At day 60, ads will pop up again for 10 days and then stop again. They show up again at day 100 for another 10 days.
This helps fight banner fatigue.
And people won’t notice when your ads go away, but our brains somehow remember little things like domain names or logos. When the ads pop up again, they get noticed because they’re familiar—but they haven’t been seen for a period of time.
Go Deep in Segments
Breaking down the “interested” segment even further can help you pin point an even more qualified audience segment.

By using “Time on Site” to build a remarketing list (covered in part 3), you only add the most engaged visitors to your remarketing list.
Another approach is to think about how ‘deep’ into your site they get. So, people that add a product to the cart is one level, viewing the cart is sign of deeper interest and finally a view of the checkout page is an even larger expression of interest in your product.

In this instance we want to show a specific ad to people who viewed the cart between 10 and 15 days ago, but haven’t yet been to the checkout page. You might for instance bid a bit more to show ads to people that have viewed the checkout for that same time period.

Your website is going to dictate what “interested” means. You may have 6 levels or just 1. The time frame may be days or months depending on your products.
Apply this Remarketing Grid to your business and see how you can change it so it’s tailor made for your site, your traffic and your profit.
Part 2: How to Put The Remarketing Grid into Practice in Your AdWords and Facebook Accounts
This is Part 2 of my “Remarketing Grid.” It’s focus is to help you visualize your remarketing efforts, which in turn makes setting up the needed elements in Adwords and Facebook that much easier.
In a nutshell—your site traffic is not all equal and nor should you treat them that way.
The key to really profitable remarketing is segmentation.
Let’s get into a bit more detail about how you go about segmenting your traffic into a grid that outlines the more profitable chunks of your traffic. We’ll start with how to do it in AdWords and then cover the same ideas for Facebook ads.
Creating your Remarketing Grid with the AdWords Interface
Before you start building any remarketing lists, it’s important to factor in audience size to each list you make.
There are no absolutes other than Google requiring a minimum of 100 people on your list. However if your audience size is less than 1,000, consider expanding the date range — an audience of less than 1,000 is probably going to be too small to be effective.
Likewise at the other end of the scale, if your audience size is greater than 10,000 then it may pay to reduce the date range to target a smaller segment of your audience.
Once your lists have enough traffic volume it’s time to segment by behavior.
Part 1 explained that the behaviors we’re looking for are:
- Uninterested
- Interested
- Buyers
Remarketing Segmentation: By Buyers
This is easy enough and it’s always a little satisfying to know how big your buyers list is.
The simplest way to do this is to build a list from traffic to your Thank You page. This would be the page that people see after purchasing or entering their details. Don’t have a Thank You page? Go make one before reading any further. It’s essential.
Remarketing Segmentation: By “Interested”
Interested traffic is the key to the Remarketing Grid. This is the segment that you’re going to get more conversions from, and it’s important to understand how people can show their interest in you based on their behavior on your site.
For eCommerce it’s fairly straightforward. Anyone that has been to the cart or checkout page is someone that intended to give you business, but something stopped them.
These lists are going to be simple with large volume eCommerce sites.
For sites with lower traffic, take one step back. People looking at product or category pages are showing that they’re at least looking for something specific.
Lead generation sites don’t have such obvious clues… but it’s pretty fair to assume that people going beyond the homepage have more than a passing interest.
Key sales pages may be another source of traffic that identifies as “interested.”
(Part 3 of this series will show you how to use Google Analytics to find more ways to identify and define interested traffic.)
Remarketing Segmentation: By “Uninterested”
By identifying the interested, we’ve also identified the uninterested.
Anyone who isn’t present on any of your interested lists or buyers lists—they’re just not that into you (yet). So don’t waste any budget on them.
Remarketing Segmentation: By Time
It’s always been possible to target a portion of people on your remarketing list based on the time elapsed since they were added.
It’s just been a somewhat complicated process to do so… until now!
The trick is to use something called Custom Combinations. Never heard of them?
Here’s a fantastic explanation and example of custom combinations from Google…
“You can reach a custom audience by combining remarketing lists in an AND, OR or NOT relationship. Custom combination lists let you create advanced lists out of existing remarketing lists. Say that you want to offer a special price to people who buy three products as a set – for example, a mobile phone, a headset and a charger – but these products are in three different URLs. To create a remarketing list of people who visited the three products, you could create one list of “people who visited the mobile phones page”, one list of “people who visited the headset page” and a third list of “people who visited the charger page” Then, you could create a custom combination to reach people who saw the mobile page AND the headset page AND the charger page.”
However, having run hundreds of Adwords accounts at WebSavvy and having analyzed thousands more, I know that custom combos are rarely used and a bit confusing.
That’s why I created the Grid.
I’m going to use ‘all visitors’ here just to clarify the idea of segmenting by time. Once you’ve got this though, ensure you test using ‘interested’ lists rather than all site visitors as you’ll usually get better results ( this means more profits). So let’s assume we have 3 lists:
- All visitors in the past 7 days (all 7)
- All visitors in the past 30 days (all 30)
- All visitors in the past 90 days (all 90)
In the past if you wanted to show different ads, or bid differently based on time, you’d have to create 2 custom combos:
- People on your 30 day list but NOT on your 7 day list.
- People on the 90 day list, but NOT on the 30 day list.
In other words:
- ‘all 30’ but not ‘all 7’
- ‘all 90’ but not ‘all 30’
Still with me?
As you can imagine, once you start doing this for two or three ‘interested’ segments and your buyers, and then possible with many more data ranges, the number of custom combos starts to get out of control!
The Grid solves that.
You still have to create all those lists (You were doing that anyway… right?)—but now you don’t need to use any combos at all.
Which brings me to…
Retargeting Segmentation: Excluding Traffic
We’re going to use something called Exclusions to “block” the traffic we don’t want.
So to target only people between day 7 and day 30, we simply target everyone on the 30 day list (all 30) and exclude everyone on the 7 day list (all 7).
For the technically minded… you can add exclusions in Adwords at the Campaign or Ad group level, which you choose will depend on the structure of your account.
Ad group level is probably safest to use unless you’re going to create a new remarketing campaign for every segment—which isn’t recommended.
Remarketing Grid at Work: AdWords
For this example, let’s try and target people that have viewed the cart page in the past 30 days, but NOT anyone that made it a step further (to the checkout page), and NOT those people viewing the cart page in the last 15 days.
Why? Well we might be targeting the more recent visitors (for this segment) in a different ad group (and probably bidding more for those).
And we might be targeting the more valuable checkout viewers in yet another ad group.
Yes, that’s a lot of different segments—every square on the grid is a potential target and therefore a potential ad group. You don’t have to target them all separately, but your campaigns will be more powerful and more profitable if you do.
Back to our second example.
We can picture this using the grid:

So to target this group we could (the old way) create 3 (yes, 3!) Custom Combinations.
- Custom Combination of cart 30 but not cart 15 (cart 30-15)
- Custom Combination of checkout 30 but not 15 (checkout 30-15)
- Custom Combination of those two; cart 30-15 but not checkout 30-15!!!!
Not the most intuitive way to do this, right?
Or, we could simply create an audience targeting visitors to the cart in the past 30 days (‘cart 30’):

And then add this audience to our ad group:

And then scroll down and add 2 exclusions (in this case at the ad group level): ‘checkout 30’ and ‘cart 15.’

Much easier, right?
To target any 1 ‘square’ on the grid, target that audience and then exclude the square to the left and the square below:

The only constraint is your imagination… well and the number of people in each segment.
Let’s recap your task list:
- Experiment with different segments and time frames.
- Build the lists first and keep an eye on the number of people on each.
- Test setting up your ad groups and running ads to each of those segments.
Remember you can use the grid to show different ads and (more importantly) bid different amounts to each segment.
Creating your Remarketing Grid with the Facebook Interface
For all the audiences you’re going to create for the Remarketing Grid you’re going to need to make a custom audience.
You’ll do this in your Facebook Ads Manager >> Tools >> Audiences.

The campaign objective that gives you the most clarity over your remarketing is the “clicks to site” objective.
Conversion objective campaigns don’t give you the same control and transparency over your results and they tend to be more effective with larger audiences.
Before getting too far into these audiences, it’s vital to remember that on Facebook your audience size is going to dictate the time frame and the budget you use.
People treat their Facebook newsfeed like they would their property.
Most people will tolerate the occasional unsolicited visitor knocking on their door, but if that person keeps coming with the same offer day after day, they’ll be given some rough treatment. Your ads can get the same treatment if they show up too often.
It’s called ad fatigue and it happens really fast in Facebook so you’ve got to be aware of it. (Make sure you keep an eye on frequency on any of your remarketing campaigns.)
Understanding that, it’s key to have a sizable audience that fits your time frame and never advertise to an audience of less than 100 people for more than 1 day. If you’ve got a 5 day list of 100 people, chances are your ads are going to show up too often and experience some negative feedback!
Remarketing Segmentation: By Buyers
Just like in AdWords, you want to create a list of people that have purchased on your site.
To do this you’ll need the url of the Thank You page and create a custom audience of 180 days to that specific traffic. That’s the largest possible time frame for Facebook.

If you’re an eCommerce site where you’d hope that your buyers are buying more often, create more buyers lists that suit what you’d expect their buying cycle to be.
For example, in the fashion market, repeat customers may happen every month — not so much in real estate.
Remarketing Segmentation: By “Interested”
Much like AdWords you must identify how traffic is showing they’re interested in what you have to offer.
eCommerce is going to have more obvious signals, like traffic that has looked at the cart or traffic that has viewed the checkout page. If you’ve got an eCommerce store, use the product sales objective to give yourself the ability to show ads to people who’ve viewed a product, added to cart and so on.
Category traffic is another great example (see below) as it lets you show an appropriate ad to interested traffic.
Like I said above, lead generation websites can use a new feature called Custom Combinations, where you can create an audience that has been to two or more pages.

In this example the person will only show up in the audience if they’ve been to the sales page AND the homepage. If you can identify the pages that your traffic are looking at before converting, you should include that in your custom combination!
Retargeting Segmentation: By Time
The simplest way to segment your audience on Facebook is by time. When you create a custom audience off of your website traffic, the default time frame is 30 days. But that simply ignores the fact that the person on day 29 is significantly less likely to take action than the person on your site yesterday.
You can have a setup very similar to the AdWords portion:
- All visitors in the past 7 days (all 7)
- All visitors in the past 30 days (all 30)
- All visitors in the past 90 days (all 90)
If you have enough traffic, duplicate this time frame with each of your segments of interested traffic. If you still have loads of traffic, try even shorter time frames, but remember, you’ll need to have unique creative to send to each segment you make.
Retargeting Segmentation: Excluding Traffic
Where can you exclude and include these lists you’ve made?
In Facebook it all happens at the Ad Set level. You can choose the custom audience to target and your ads will show to that audience only. But just as important are the audiences you exclude.
Remarketing Grid at Work: Facebook
Here’s a basic example from an eCommerce store dealing in ladies fashion.
One of the categories on their site is “Tops,” so previously we’ve made an audience that is comprised of people that have been to those pages.

When I selected the target audience I also wanted to exclude the buyers from the past 14 days as they’re much less likely to buy again.
If you’re to consider this in terms of the Remarketing Grid, we’re only showing ads to the people who were recently interested and we’re excluding the buyers — Therefore taking up only the center left of the grid an audience that should be profitable… especially if there’s an incentive in the ad, such as a discount!

Occasional Ads
You may want to remind people who are a little more to the right of your remarketing grid.
Setting this up on Facebook is very easy. Simply define a window of people you want to remind to visit your site.
Let’s say you have a slightly longer buying cycle, so create an audience of site visitors from the past 45 days, and another from the past 50. Target your 50 day list and exclude the 45 day list, and your all time buyers list.
Now your ads will pop up as nice reminder of your services. Plus, you can take advantage of Facebook’s options to tailor your message or offer accordingly.
There you have it—setting up your Remarketing Grid using AdWords and Facebook. Everybody still with me? Good, because the best part of all of this is that it can be refined further still in Google Analytics (AdWords only).
Part 3: Advanced Remarketing with Google Analytics
The last aspect of the Remarketing Grid involves using Google Analytics to get much more detail about your site visitors’ behavior.
(RELATED: Applying Website Analytics to Your Digital Marketing)
If you’ll remember from Parts 1 and 2, the key to the Remarketing Grid is identifying visitors that demonstrate higher than average interest in our products and services, and only using your advertising spend to (re)market to those most interested.
The key assumption being that the more interested someone appears to be, the more likely they are to buy (or for lead gen sites, sign up).
Using Google Analytics to identify this ‘level of interest’ is essential in that it addresses the major shortcoming of both AdWords and Facebook’s remarketing potential. Both use ‘rules’ to build remarketing lists based on URL activity.
Google Analytics, however, lets you create remarketing lists based on a huge variety of visitor behaviors.
(It’s worth pointing out that this strategy can only be used with AdWords, sorry Facebook marketers.)
Before diving into Google Analytics, let’s consider mindset. It’s impossible to predict what will happen for an individual user to your site.
But when we observe and measure behaviors of large groups of people, we find that similar groups of people tend to act in very similar ways.
For example, your mobile visitors tend to buy less than desktop visitors, or visitors from one AdWords campaign tend to buy more than those from another campaign—which is why we track CPA and use that to set bids in AdWords… but let’s not get sidetracked!
Defining Interested Visitors With Google Analytics
The “ultimate” sign of interested behavior, of course, is that someone buys from us—or for lead gen sites, they convert—which typically means they complete some sort of form, or call a number.
There are dozens of behaviors that might indicate someone is more likely than average to buy. And which behavior you pick will depend on…
- Your business
- What type of product you’re selling
- How frequently people buy from you (once or often)
- How long the decision-making process is (selling houses is very different to selling car tires)
The Process
Before we look at some potential behaviors, a quick note on the process:
We’re brainstorming ideas (posh marketers call these ‘hypotheses’) and then using our Analytics data to confirm that we might be on to something.
If it looks like the data supports our crazy idea, we’ll build the necessary remarketing lists. And then roll these out in an AdWords campaign and go test the idea with real money in the marketplace.
Don’t expect to win 100% of the time.
You may find that the best theories bomb in the real world. It’s okay, get over it. Have your beverage of choice and jump back in the game.
Let’s examine a couple of behaviors that are most likely to work for a wide range of situations and therefore help you the most…
Time on Site / Page Depth
The assumption here is that the longer someone spends on your site, the more pages they’ll view and the more likely they are to convert. Most people leaving after 15 seconds or just 1 page aren’t very likely to buy on their way out.
NOTE: Advanced GA users: please note this is a simplification and you may want to create custom reports for both dimensions.
To find out how long people spend on your site, you need the “session duration” report.
You’ll find it under Audience > Behavior > Engagement and it looks like this:

Not particularly helpful is it? It doesn’t show what they actually did!
Let’s try the “page depth” report (click the blue “page depth” link towards the top of the page under “Distribution”)…

Prettier, but still not very useful.
So we need to create a “custom report” – don’t worry, you can use mine.
Log into Analytics and then paste this link into your Analytics window:
https://goo.gl/v7vdP5
Choose the ‘view’ you want to apply it to — you’ll either just have one view, so this is easy, or if you have lots then you probably know what you’re doing, so just pick one for now. You can always add this report to other views later if needed.
Once inside the report you should see something like this (for ecomm sites).

If you have a lead gen site, you’ll want to ‘edit’ the custom report (using the link right at the top) and then replacing the ecomm fields with goals. See below…

Change the bottom three blue metrics to either the overall goal values like this….

or use a specific goal…
goal 1 completions
goal 1 conversion rate (this is the main metric that matters and will be the most useful)
goal 1 value
Once you’ve got the report displaying numbers that are useful to you, scroll down… if you see that conversion rate goes up the deeper someone goes into the site, you’re on to something.
Here we can see that hundreds of people a month go 30 pages deep into this site and when they do, they convert at over 10% … not bad for an ecomm site.
Once they get over 60 pages in about 1 in 3 are buying. This is a group of people we want to remarket to!
People that have acted just like the buyers — they’ve demonstrated a very high level of interest (looking at 60+ pages!), but they haven’t bought…. yet!
Put an ad in front of these people and a large number are going to come back and buy.
It’s like taking candy from a baby. And your client/boss/spouse will love you when you invest your ad budget this well.
Creating Your Analytics Remarketing List
Once you’ve identified a group of people you want to remarket to, you’ll need to first create the Audience in GA, then add this to an AdWords campaign in the normal way.
First go to the admin panel of your analytics account…

In the middle column, called ‘Property’, look for the ‘Remarketing’ section and click on Audiences just below that:

You’ll need to choose the AdWords account that you want to send the remarketing audiences to (if you see more than 1 AdWords accounts listed, you’re probably familiar with some advanced stuff so no explanation should be needed ;).

Click ‘next step’…
And if this is the first time you’ve done this, click ‘enable’ when you see the message.
Google will automatically create a list/audience called ‘all users’. But we know better than to use that, right?
Click the big red ‘+ new audience’ button…
Now you need to ‘define the audience’ you want to build.

You have 2 choices. Use one of the recommended audiences, or create one from scratch.
Below I’ll explain the ‘user type’ option.
For now click ‘create new’…
This takes you to the complicated-looking ‘audience builder’…
Assuming you’re going to build an audience based on ‘page depth’ you’ll notice it’s NOT one of those listed under the ‘behavior’ section. So we need to click on ‘conditions’ in the bottom right corner.

In this case you can see I’ve set the condition to be ‘page depth > 10’…
Anyone that meets that criteria will get added to our remarketing list.
Click ‘apply’.
NOTE: You can probably tell from the ‘or/and’ bit on the right that you can add multiple rules. Go wild and crazy and experiment with this later… for now, let’s keep it simple.
Now choose the duration for the list (explained in parts 1 and 2) and name the list (in this case “Page Depth > 10 {30 Days}”) and click Save.

And that’s it!
Now you can go into AdWords and add this list to either a new or existing remarketing campaign.
User Behavior
Time to go digging in Analytics for another story.
Go back to your Analytics reports. This time go to Audience > Behavior > New vs Returning.
Change the little drop down above the data table to flick from ‘eCommerce’ to ‘All Goals’ depending on what you’re tracking.
You may find stats like this, where returning users are almost three times more likely to buy.
Again, why not just remarket to these people instead of everyone!

Amount Spent
You might — if you have frequent buyers — want to advertise to recent purchasers of your products.
In which case the ‘level of interest’ might change to be the actual amount spent.
By segmenting my buyers based on spend, I’m able to bid more on the ‘whales’ (the ones that spent way more than average) and focus my efforts there.
Early days for this campaign, but you can see that remarketing to recent buyers (0-7 days after they bought) that also spent >$150 led to a conversion rate of 26% !
The return is equally lovely, $9.94 back in revenue for every $1 spent on ads.
Continuing to remarket to them after a short break (31-90 days after buying), also generated some extra sales (26) and makes the client $3.42 for every $1 they spend on ads.

Keep Experimenting with Analytics and the Remarketing Grid
This Remarketing Grid is a fluid beast!
Your job now is to continue brainstorming ideas on which behaviors might indicate someone is more likely to buy from you.
- Which device do they use?
- Which browser?
- Do iPhone users buy more than Samsung?
- Does their country make a difference?
- Does their age?
- Gender?
- What about if they came from Facebook, Twitter or Pinterest?
- Are people that download a PDF more likely to sign up?
And remember the only way to know for sure, is to run ads and test in what the granddaddy of marketing Claude Hopkins called the ‘court of last resort’.
In other words… spending some money and seeing how your prospects and customers behave.
It’s all about their behavior!
The post The Remarketing Grid: The Science of Ad Retargeting Audience Segmentation appeared first on DigitalMarketer.
]]>